Archives

Organizing For Your Personality

Gears of BrainHave you ever wondered what type of personality you are and how it might affect your organizing strategies?  I have.  My curiosity inspired me to explore this subject in greater detail and during my exploration, I came across Deb Schwartz’ take on the subject (as found on RealSimple.com).  I share it with you here:

Whether you’re innately tidy or, um, not, find strategies tailored to how you think.

Left-Brained vs. Right-Brained

Order is individual. Some minds are built to create pristine stacks, and others have a natural urge to sprawl and display. We’ve all heard about left-brained and right-brained people and the different tendencies associated with each. A quick review:

  • Right-brain types are visually oriented. They tend to think in images rather than words, focus on the big picture rather than the details, and go through life in a somewhat seat-of-the-pants (a.k.a. scattered) way.
  • Left-brainers are those who think in words (attention, list makers!), do a lot of advance planning, and approach challenges in a rational, linear way.

So why not use this information when implementing order at home? It could be the solution to the endless search for the right organizing gear and offer relief from the disappointment (and cost) of failed attempts. “The key to successful organizing,” says Melissa Picheny, principal of a functional-design company in New York City (declutteranddesign.com), “is to pay attention to your personality. Then come up with a plan that conforms to it, rather than trying to work within someone else’s system.”

So, I ask you….how is your brain wired to work?  Are you a right-brainer or a left brainer (like me)?  Don’t know the answer…. CLICK HERE to take a simple quiz and find out.  You might be surprised like I was and the answer could help you define your organizing style.

~~~~~~~~~

So what did you learn?  Are you a right-brainer or left-brainer (like me)?  I would love to have you share your findings in the COMMENTS BELOW.

READY FOR THANKSGIVING? Don’t fret, help is here.

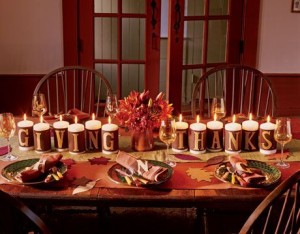
giving thanks

TEN TIPS TO A TERRIFIC TURKEY DAY

Are you ready for Turkey Day?  Don’t fret if you’re not, there’s still time to get everything together!  Check out these tips for help on how to get organized for the big day! 


 1. GATHER YOUR IDEAS AND RECIPES: Check out the mountains of magazines in the stores; eye catching pictures can help to inspire your menu. Browse the internet for some more ideas (foodnetwork.com, marthastewart.com and pinterest.com are my favorites).  Take some time to watch the cooking channels highlighting holiday suggestions.

 2. DESIGN YOUR MENU: Create diversity by including some traditional favorites from the past as well as adding a few new recipes that can become favorites in the future. Try to balance your menu with color, texture and flavor to entice your guests.  And remember…you want to make twice as much as usual for leftovers!

 3. CREATE A SHOPPING LIST: Write down all of the items from each recipe to make a master shopping list.  You might want to break your shopping into several trips if time allows: packaged & frozen items the week before, turkey the week of, produce 1-2 days before you cook.  Try not to get caught up in all the frenzy; there will still be frozen turkeys the day before the big day – you just may have to flash thaw the turkey or eat later in the day!  If something you want isn’t available, choose something new!

 4. PLOT A TIMELINE: Timelines detailing when things should be completed helps to avoid snafus like having two things needing to be cooked at the same time on the stove or in the oven!  It helps to construct one by working backwards from the time of the meal.  Try to do as much as possible ahead of time so you can relax and enjoy doing something special or spending time with your company.

 5. CHOOSE YOUR SERVING DISHES: This will save guessing which food will go in which dish on turkey day.  Label the dishes with the food item that belongs to it so others can help you put the food on the table and everything will stay hot longer.

6. SET THE TABLE: This is a great time to showcase your special dishes!  Choose your favorites, wash and dry ahead of time and put aside covered to avoid dust.  If you’re lucky to have a separate dining table, set it up early in the week to make sure it looks the way you want (again, cover with a tablecloth to protect).  If not enough time, set it early in the day and always take advantage of extra hands!

 7. CREATE A CENTERPIECE: Professional arrangements should be ordered at least a week in advice; cut flowers/arrangements can be purchased in most grocery stores up to the day.  Think about alternative centerpieces to flowers: edible arrangements are wonderful substitutes – use what’s in your refrigerator (lemons, oranges, artichokes or asparagus make great choices).  Get kids involved and make a paper cornucopia or turkey…this could add interest to your table and inspire conversation among your guests.

 8. PUT YOUR HOUSE IN ORDER: Clean your main rooms a few days ahead, then do a quick run through with a duster the day before.  If you’re entertaining overnight guests and have a separate area/room for their use, make sure the bed has clean sheets/blankets and there are a set of fresh towels; add a special touch with an amenities basket like those found in hotels – sample sizes are readily available in most pharmacies or discount stores or a ready make basket can be purchased from a wholesale store.

 9. ADD SOMETHING DIFFERENT: Try adding music to your special day: use a portable cd/mp3 player with a speaker, the computer or even music channels on the television to set the mood.  This will help create a welcoming environment for all those who enter your home.

 10. RELAX AND STAY FLEXIBLE: Try to find some pockets of time each day leading up to the big Turkey day to relax: 15 minutes of a relaxing activity will lower your stress levels – walk, exercise, meditate or just breathe!  And there’s bound to be mishaps – remember to stay flexible and accept whatever comes your way – you’ll work through it.

Cheers to a happy and enjoyable Thanksgiving!

PRODUCT TIP OF THE WEEK

This Week’s Product

is for both the Home & Office

As an organizer, I often use products that make not only my life easier, but my clients.  One product that has come in handy in both a business AND a home setting is my label maker; I don’t go anywhere without it!  This tool is like that of a hammer for a carpenter, a stethoscope for a doctor or a calculator for an accountant.  It is truly that important!

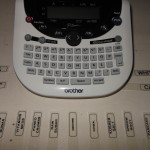
DSCN1325The label maker that I have used since I’ve been in the organizing business is Brother P-Touch Desktop Model PT 1290.  This is what it looks like.  Now this particular model has been upgraded (to Brother PT 2030) and you can find many other options that will fit your specific needs.


This is a highlight of what I love about this product:

          • can be used in both home & business applications
          • lightweight & portable
          • simple to use; easy to master
          • no software needed
          • has multiple formats & offers different framing options
          •  accommodates 2 rows of text
          • battery & AC operated

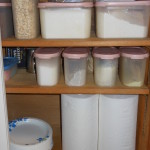
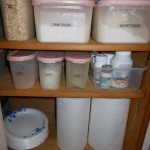
I could go on and on with more of the features, but the proof is in the pudding.  Take a look at a recent reorg I did in my own pantry cabinet.  Picture 1 is without labels; Picture 2 is the labeller with the labels; Picture 3 is with labels.  The containers are fine without the labels, but if left in that state, anyone who accesses the cabinet always has to take extra steps to figure out what’s inside.  With the labels – quick, easy identification of what’s inside.  The entire process took less than 30 minutes start to finish using my desktop labeller.  Definitely a step well worth the effort.

DSCN1239     DSCN1241    DSCN1249

Now you may be thinking, “I’m not an organizer, so why would I need label maker?”  The answer remains in understanding where a label maker can come in handy.  Check out this list:

Applications for label use:

Home

  • Kitchens (cabinet/drawer containerizing)
  • Linen Closets (shelf/item labelling)
  • Bathrooms (medicines, hygiene products)
  • Garage (tools)
  • Craft Rooms (product pieces)
  • Children’s Rooms (toys, school supplies, clothing)

Business

  • Files (Labels, tabs, drawer id)
  • Inventory Control (shelf id, product id)
  • Supplies (identification of sm. pieces)
  • Drawers (separation/management)
  • Notebooks (tabs, separators, title, spine)
  • Rolodex Files (title, separators)

Above are 6 suggestions for both home and office; now it’s your turn….look around your home or office and think about the many places you could use a label maker.  Where do you think you can find an application for a label?

Now check out the links listed above and choose one that will fit your needs and lifestyle and label away!  Send us some pics and let us know where you found an application – your project might just inspire someone else!

3 Easy Steps to Organize Your Cabinets & Maximize Your Kitchen

ARE YOUR CABINETS OVERSTUFFED, INEFFICIENT AND DIFFICULT TO USE?

IS IT HARD TO FIND WHAT YOU WANT OR EASILY REACH WHAT YOU NEED?

IS THE DISORGANIZATION IMPACTING THE FUNCTIONALITY OF YOUR KITCHEN?

If you’ve answered YES to any of these questions, it might be time to reorganize and and setup your cabinets to increase the efficiency in  your kitchen.  Using a few basic organizing techniques, implementing a variety of space-saving tools and investing a little bit of time will quickly maximize the everyday function of your kitchen space.  Read on to learn how you can get your cabinets organized today.

CLEAR IT ALL OUT

The very first thing you should do is choose the cabinet(s) you wish to work on; choose your target cabinet based on the time you have available and by using this general guideline:

  • 2 Hours: 1 cabinet
  • 4 Hours: 2-3 cabinets
  • 8 Hours: 4-6 cabinets
  • 12 Hours: 4-6 cabinets & a small pantry

Once you’ve determined what cabinet to focus on, clear everything out of that cabinet.  If you remove food items, check the expiration date for each item, TOSS what is expired and SET ASIDE what is left.

If the cabinet contains dishware, check each piece for broken parts (TOSS), pieces you don’t use very often (MOVE TO ANOTHER LOCATION) or pieces you no longer wish to keep (DONATE OR GIVE AWAY).  Wipe down the cabinet and consider installing new shelf paper or lining.

CATEGORIZE YOUR ITEMS

Once you know what you will be keeping (you should have been able to decrease your overall inventory by at least 1/3 with the above purge technique), then it’s time to GROUP LIKE WITH LIKE.  Here’s an example of possible groupings:

For food items:

♦ canned goods ♦ boxed goods
♦ cereal ♦ baking
♦ spices ♦ oils
♦ grains ♦ pasta

For dishware:

♦ plates ♦ bowls
♦ glasses ♦ coffee cups
♦ serving platters ♦ silverware
♦ mixing bowls ♦ baking pans
♦ pots & pans

After the items have been sorted through and grouped accordingly, decide on which cabinet in which they will be housed and return the appropriate items to the designated location.  Here is a general location guideline:

  1. Dishware & utensils near the cleaning source (dishwasher/sink)
  2. Servingware near the serving spaces (place where you eat)
  3. Bakeware near the oven; mixing bowls near the prep center
  4. glasses/cups near the source of drink (refrigerator, cold drawer or coffee station)

CONTAINERIZE TO MAXIMIZE SPACE

If you have food items that are used on an everyday basis, consider implementing a system to house that food.  Containers are great for maximizing space and keeping food fresher for longer.  They also make identifying contents quick and easy as well as reaching a breeze.
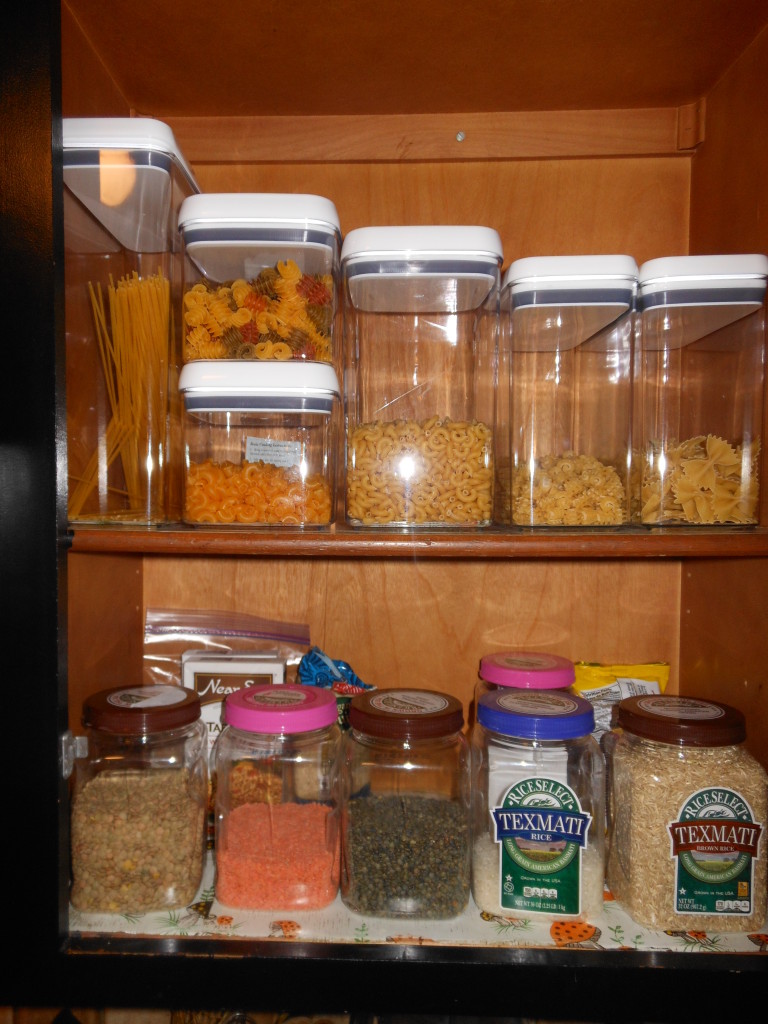
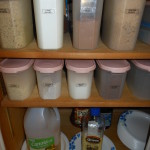
AFTER Photo of pasta/grain cabinet
Here’s an example of a container system that was used for a client’s recent cabinet makeover.

A combination of store-bought containers and repurposed containers was implemented to reduce  cost.

The clear containers allow the food to be easily identified and the shape of the containers make it easily reachable.


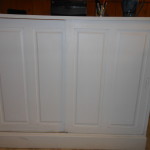
Another example of maximizing space with containers is illustrated below with my own pantry container system that was designed using products from Tupperware.

The sliding doors on this cabinet make everything easily accessible, the container system inside helps to keep the food organized and fresh and the small space is maximized to its fullest storage capacity.  Adding labels makes it easy to see the contents at a glance and is like the icing on the cake!

Maximizing your kitchen cabinets can be quite simple using the 3 Cs strategy detailed in this article.  Once you have implemented the techniques, you will find that you will no longer answer YES to the questions above and you will quickly be on your way to maximizing the functionality of your kitchen.

Now it’s your turn….TELL US if you think this is something you want to try by dropping a comment below.  As always, we’d love to FIND OUT how it turns out for you – you can give us all the details in the comments below. And…

DON’T FORGETthere will be another blog post in this series to follow: Setting up an Effective Landing Zone. You can receive this post, future ones and our upcoming newsletter directly in your mailbox if you sign up HERE.

Turn Your Cluttered Counters Into Organized Heaven


3 EASY STEPS TO TURN YOUR CLUTTERED

COUNTERS INTO ORGANIZED HEAVEN


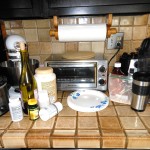
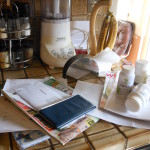
DO YOUR COUNTERTOPS LOOK LIKE THIS?

Have they become cluttered and disorganized?  Has their purpose been lost in a sea of clutter?  This can quickly happen if you spend a lot of time in your kitchen, use it for many purposes and have lost the good habits that keep it in order.  Counters contribute to the efficiency as well as the ease of work time in your kitchen – keeping them organized can save you much frustration.  Hope is not lost, though.  I can help you overcome this challenge in 3 easy steps.  Here’s how:

    1. RE-ESTABLISH THE PURPOSE

You must remember that counters are designed as a work surface not as a dumping ground.  Shifting your mindset and re-establishing the purpose of this valuable real estate will help you to foster good habits in maintaining that purpose.  Whenever the kitchen starts getting messy, repeat the reminder to halt those nasty bad habits you might unconsciously perform; you might want to even consider posting a saying about the purpose to remind you. 

   2. CLEAR THE CLUTTER

Countertops are like wastebaskets (just flatter): they accumulate junk quickly and easily overflow.  To avoid this problem, set aside time to declutter the counters and clean on a regular basis (clean daily; declutter weekly):

      • Remove anything old, broken or no longer usable
      • Put away anything that does not belong in the kitchen
      • Wipe down all counters
TIP: Keep a receptacle (basket, box or container) nearby to use as a landing zone for decluttering; put everything to be removed into that receptacle to make carrying to

   3. SET UP FOR SUCCESS

Section your counters into work stations: coffee, prep, washing, cooking, etc. and only store what you need in that space to perform the job within that section.  Make sure the stations are located near the cabinets/appliances that house tools to perform the tasks of the station.

Here’s an example of one of our happy clients’ kitchen counters after her makeover.

You, too, can have counters like this once you use the above steps!

Once you have re-established the purpose of your counters, cleared out the clutter and divided your counters into workstations, your kitchen can quickly become an efficient space where you can enjoy time with your friends or family and the delight of cooking wonderful meals.  DROP US A COMMENT and let us know how these easy steps worked for you.

Stay tuned for the next blog post in this series: HOW TO ORGANIZE YOUR CABINETS and gain more ways that will maximize the efficiency in your kitchen.  Don’t lose any valuable time – receive the next post (and others) directly into your inbox! 


Organize Your Kitchen to Maximize Efficiency

kitchen luxury home

A 4-Part Series to Maximize the Efficiency in Your Kitchen

Kitchens are often referred to as the hub of our homes.  Most of us spend a huge bulk of our time in this vital room and often use it for many purposes.  As such, it can quickly become overcrowded & disorganized and the main purpose of the room can easily be lost in a sea of clutter.  I have developed a 4 part blog series that will help you overcome that challenge. 

THIS SERIES WILL INCLUDE posts showing you how to:

  • organize your cluttered countertops in 3 easy steps
  • layout the inside of your cabinets using the 3 C’s
  • create an effective landing zone 
  • set up your refrigerator to save space, time & money

THIS SERIES IS DESIGNED TO help you

Organize your kitchen to maximize its efficiency and create a space that will be easy for you to work and live in through guided, practical solutions.

If you suffer from…

    • countertops that are cluttered and disorganized
    • cabinets that are at their maximum storage capacity AND you still need more room
    • having too many papers in too many places all over the kitchen 
    • never seem to have what you need in the frig to make your meals

WE HAVE SOLUTIONS!

STAY TUNED… PART 1 of our series will be posted on FRIDAY.

TO GET IT DIRECTLY IN YOUR INBOX

4 Helpful Hints to Holiday Shopping Happiness, Not Madness!

Gifts in Shopping CartAs the end of December draws closer, most of us find ourselves  knee-deep in the myriad of holiday preparations and maybe even succumbing to the madness of the holiday season.  Gift shopping can be a big contributor to that madness.  I’ve experienced that myself this week! The two shopping forays I’ve had so far this season have been vastly different from each other.  The first: a relaxed and enjoyable stroll through the mall with a few easy purchases – leaving me with a satisfied feeling; the second: a marathon affair, bumping elbows with lots of shoppers and not finding what I was looking for – leaving me grumpy and tired.

So what was it about that second trip that made it so miserable?  I’ve thought about that question all week (especially since I have to shop again THIS weekend); the answer finally came to me after many cups of warm tea and lots of rocking in my favorite chair!  There were 4 things I did differently on the first trip that I did not repeat on the second; I am sure if I had, the second would have been much easier and more successful.  Read on to find out more about them…

4 HELPFUL HINTS TO HOLIDAY SHOPPING HAPPINESS

(not madness)!

NEVER LEAVE HOME WITHOUT

making a list (and checking it twice).  Put all of your ideas into one place so that you have a clear plan and can stay focused on what you need to purchase. Take advantage of modern technology by using a List App on your smartphone.  Be sure to include sizes & color preferences to minimize returns.  Remember to stay flexible and have a backup choice ready in case things are not available.

CHECK OUT THE SALES

Before heading out to the stores, check websites for online coupons or deals, download them to your smartphone or print out coupons.  Computer not your thing?  Collect the flyers before your shopping date and clip coupons for the items on your list.  Save yourself both time AND money by preparing ahead of time.

EAT, DRINK & BE MERRY

Shopping is exercise in itself and to stay strong during a marathon shop, you will need food and drink.
    • Eat a healthy & filling meal/snack before you leave to shop
    • Take a break midway to refuel yourself
    • Make sure you drink a good amount of fluids throughout the day
    • Munch on a healthy snack on the way home

It’s important to fuel your body to keep both your sugar AND stress levels low.

GIVE YOURSELF A BREAK

Shopping is hard work and takes a toll on your feet and your back.  (It’s not easy to carry all those bags of goodies!) If you’re doing a marathon shop, make sure to take frequent breaks just to sit and relax.  Use the time to

    • regroup your strategy
    • adjust your purchase ideas or
    • drop off the packages to your car

While you’re resting, take a little time to people watch and enjoy the atmosphere!

One would think that knowing something as simple as these hints would help defray the stress, aggravation and chaos that can arise during holiday shopping.  Remember, though, it’s not what you know that will make you successful in your endeavors, it’s what you implement that will make the difference.  Take the time to implement these helpful hints and set yourself up to succeed during your next holiday shopping trip; ease your stress and minimize the holiday madness this year so that you may enjoy this part of the holiday to its fullest. Happy Shopping!

Now I ask you this, HOW WAS YOUR LAST SHOPPING TRIP: easy and relaxed or crazy and nerve-wracking?  Drop us a comment below and let us know what your shopping trips have been like and how you’ve turned them into enjoyable experiences.  We’d love to share your feedback so that our fans can learn from those experiences and have an enjoyable holiday shopping trip (or two) as well!

WISHING YOU ALL A HAPPY HOLIDAY!

TAME THE HOLIDAY MADNESS

Tame the Madness and Enjoy the Holiday

The American holiday of Thanksgiving is only 3 days away….what are your plans?  Chances are that they will center around preparing, traveling, visiting and, of course, the inevitable EATING. Somehow this day seems to have become the biggest eating day of the year! If just thinking about all the things you have to do to get ready makes you stressed out before you even begin, take heart….it truly can be a relaxing and enjoyable time if you set it up to be.

For many years I started preparing for Thanksgiving Day several weeks in advance; lists of menu options, guest lists, preparation timelines and such overflowed my desk starting from the beginning of the month.  Then one year, I had surgery the week before and found myself without the normal lag time to prepare;  I was released from the hospital only a few days before and had been so sick prior, that my desk was devoid of my typical planning lists; I actually thought we’d have to cancel the “big feast”.

It was that year that I realized that you don’t NEED to take weeks to prepare; with some careful planning, a little preparation and keeping yourself focused, one really only needs a short period of time to prepare for the wonderful holiday of Thanksgiving (or any other for that matter) wherever you are.  I still use lists to get ready, but they are in a much more streamlined fashion to getting everything accomplished where the timeframe can be changed to even prepping the day of if need be.  I’d like to share the Ready, Set, Go! method I use to tame the holiday madness so that you, too, can enjoy ANY holiday in the truest spirit it is intended!

Click Here for the 3 Step Approach to Taming the Holiday Madness.

The year that I was recovering and learned my valuable lesson was the time that the turkey wasn’t the most beautifully dressed and the table wasn’t expertly decorated, but a memorable holiday meal and Thanksgiving was forever etched in our memory banks with the helping hands of many.  It turned out to be one of the most rewarding days my family ever spent together because we set it up to be by staying focused on what it was all about and who we were with rather than what it looked like or tasted like (even though that was great too)!

So to you and yours, wishing you a wonderful, and meaningful holiday!


Inspiration to Fall into Organizing


Fall has officially descended upon us here in the northeast part of the United States.  It has brought the gloriously warm, sunny days and envelopes us with its crisp mornings and cool nights.  This season always provides such great joy and inspiration!   As the days begin to shorten and the thermometer falls, we are reminded that the cold weather is not far away.  What better way to get ready for it than to organize some of your outside areas?  Let the fall season provide the inspiration and motivation to conquer those outside areas!  HERE ARE SOME PROJECT IDEAS TO CONSIDER TACKLING.

ORGANIZE YOUR GARAGE:  Has your garage become a dumping ground and you don’t even remember what its intended purpose is?  Have you thought about organizing it, but quickly gave up the idea because it was too overwhelming? You’re not alone. There is a way to tackle the project easily – break it down into manageable steps and work on them one by one.  We’ve posted 8 Simple Steps to Organize a Garage on our Blog to find out how. Click Here to read it.

HAVE A YARD SALE:  Cleaned out the garage or basement recently and have a lot of stuff to get rid of?  Want to make a little extra cash while having someone else take away your junk?  Remember…”One man’s trash is another’s man’s treasure”, so why not have a yard sale!  Do you think there’s no time for one or does the thought of all the work freak you out?  Visit our Blog for the Recipe for a Successful Yard Sale and you’ll get great tips on cooking up an awesome event. Click Here to read it.

CLEAN OUT THE SHED: Has your garden or storage shed become overloaded or too hard to maneuver around in during the past summer?  Have you put off organizing it all because you’d rather play in the warm weather or has it been too hot to drag all that equipment outside and clean it off?  The weather is now cooler and there’s no time like the fall to close up shop before winter sets in.  We’ll be posting a great slide presentation with easy tips to close up your shed on our blog.  Check back on the weekend of Oct. 19th to read it;  getting it ready for winter will be a piece of cake once you view our presentation!

Don’t let the winter catch you off guard.  Clean out the garage and organize it so you can maximize that real estate, maybe even bring in the car this winter.  Have a yard sale so someone else can take away your junk while you make a little extra cash and get ready for the winter by cleaning all your equipment and organizing your shed.  There’s still plenty of time to conquer all of these organizing projects AND  enjoy the fall.  Visit the links listed in this post so you can get out there and tackle it!  If you need a helping hand, contact us, we’ll be happy to help get you on your way to a war. 


RECIPE for a Successful Yard Sale

Have you seen all the yard sale signs lately and thought you’d love to have one, but just don’t know how to get started?  Yard sales are a great way to dispose of items you no longer use AND make some extra cash.  The fall is a wonderful time of year to have a yard sale since the weather is cooler and it’s so nice to be outside.  Gather the ingredients listed here and read on for instructions on how to cook up a great yard sale!  Remember…

“One man’s junk is another man’s treasure.”

INGREDIENTS:

  • All the junk that can fit in your home/garage
  • Sprinkling of creative writing
  • Small amount of organization
  • A little bit of elbow grease
  • Strategic setup
  • and a Bucketful of patience

INSTRUCTIONS:

PICK A DATE:  The fall brings an increase in community activities and you don’t want to compete with those events. Check out the community calendar for your area in advance as well as the local upcoming forecast to set a great date.

WHAT’S IN A DAY: Yard sales used to be held primarily on weekends, but times have changed.  Try scheduling your sale for a Friday (all day) to attract veteran sale goers and half day Saturday (starting early) to draw in the working crowd.  Skip Sunday altogether – people are usually attending church or other family activities.

GETTING THE WORD OUT:  Advertising might seem like an extra expense at first, but it is worth it in the end.    Contact your local newspaper at least two weeks in advance to find out their deadline and guidelines.  Keep your ad short and to the point by using simple & straightforward language.

A NEW WORD OF MOUTH: Incorporate online avenues for advertising your sale.  Advertise the sale AND large ticket items (furniture/equipment) on Craigslist or Ebay. Pass the word along social media sites such as Facebook or Twitter.  Enlist your friends to help you; they can be a great sales force!

CHOOSE WISELY:  Not all items in a yard sale will generate revenue. Items that can’t be washed or are outdated won’t sell quickly or for a good price.  Stick with popular selling items like knick-knacks, dishware, books, clothing, small appliances and children’s clothing or toys.

You gotten a good start to making your yard sale recipe: you’ve decided when to have it, assembled your ingredients and are working on the prep.  Now it’s time to cook up your ingredients and prepare it for its final presentation.

TO FINISH READING THIS RECIPE…. 

Click Here 

Complete the prompts and you will receive access to the final steps.