Tag Archive | organized

Turn Your Cluttered Counters Into Organized Heaven


3 EASY STEPS TO TURN YOUR CLUTTERED

COUNTERS INTO ORGANIZED HEAVEN


DO YOUR COUNTERTOPS LOOK LIKE THIS?

Have they become cluttered and disorganized?  Has their purpose been lost in a sea of clutter?  This can quickly happen if you spend a lot of time in your kitchen, use it for many purposes and have lost the good habits that keep it in order.  Counters contribute to the efficiency as well as the ease of work time in your kitchen – keeping them organized can save you much frustration.  Hope is not lost, though.  I can help you overcome this challenge in 3 easy steps.  Here’s how:

    1. RE-ESTABLISH THE PURPOSE

You must remember that counters are designed as a work surface not as a dumping ground.  Shifting your mindset and re-establishing the purpose of this valuable real estate will help you to foster good habits in maintaining that purpose.  Whenever the kitchen starts getting messy, repeat the reminder to halt those nasty bad habits you might unconsciously perform; you might want to even consider posting a saying about the purpose to remind you. 

   2. CLEAR THE CLUTTER

Countertops are like wastebaskets (just flatter): they accumulate junk quickly and easily overflow.  To avoid this problem, set aside time to declutter the counters and clean on a regular basis (clean daily; declutter weekly):

      • Remove anything old, broken or no longer usable
      • Put away anything that does not belong in the kitchen
      • Wipe down all counters
TIP: Keep a receptacle (basket, box or container) nearby to use as a landing zone for decluttering; put everything to be removed into that receptacle to make carrying to

   3. SET UP FOR SUCCESS

Section your counters into work stations: coffee, prep, washing, cooking, etc. and only store what you need in that space to perform the job within that section.  Make sure the stations are located near the cabinets/appliances that house tools to perform the tasks of the station.

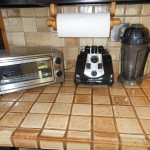
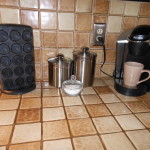
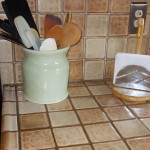
Here’s an example of one of our happy clients’ kitchen counters after her makeover.

You, too, can have counters like this once you use the above steps!

Once you have re-established the purpose of your counters, cleared out the clutter and divided your counters into workstations, your kitchen can quickly become an efficient space where you can enjoy time with your friends or family and the delight of cooking wonderful meals.  DROP US A COMMENT and let us know how these easy steps worked for you.

Stay tuned for the next blog post in this series: HOW TO ORGANIZE YOUR CABINETS and gain more ways that will maximize the efficiency in your kitchen.  Don’t lose any valuable time – receive the next post (and others) directly into your inbox! 


THE POWER OF AN ORGANIZED DESK: 3 Reasons You Can’t Live Without One (and how to get it!)

A cluttered desk is a cluttered mind.

Did you know that the above is the full version of the often used quote, “a cluttered desk is a cluttered mind”?  How you answer Mr. Einstein’s question?  I would answer, “An empty desk is a sign of someone ready to get something done!”  Are you that someone who is ready to get something done?  How about starting with organizing the hub of your business: your desk?  Desks seem to become cluttered right before our eyes with all of the paper, electronics and office paraphanelia that land on it every day.  You can easily organize that clutter by understanding why a clear desk matters and learning the 6 easy steps to clear it out.  Let’s get started by talking about the importance of a clear desk.

3 Reasons Why a Clear Desk Matters

Cluttered desks often thwart the productivity in an office and create unnecessary anxiety and stress.  Uncluttering a desk will not only unclutter one’s mind, it will also

  1. minimize resistance so you can focus on getting your work done
  2. help you work more efficiently (and you will get more done)
  3. help you free up time, energy, concentration and creativity

Overall, a clear desk can make your work more enjoyable and that gives you a productivity edge that makes work feel less like work.  Let’s move on to explore what supplies are needed to begin clearing the clutter.

Items Needed to Clear the Clutter

  • A large waste receptacle or plastic bags
  • Boxes with lids (Banker Boxes are ideal, but clear plastic bins with lids will work; in a pinch you can use laundry baskets or grocery/office supply boxes too)
  • Sticky notes (or paper & tape)
  • Writing Utensil

Steps to Clear the Clutter

  1. CLEAR A HOLDING AREA to house to where your removed items can be stored temporarily while you work on organizing your desk (can be a closet, wall/floor space, under the desk or area near office).
  2. LABEL, LABEL, LABEL: Label the boxes/bins in the following manner and place in the holding area:
    • Keep: all things that will stay in your office
    • Donate: anything that no longer has a use (or you don’t love) and is still in good working condition
    • Distribute: all things that have migrated to your desk, but belong in another room.
  3. SORT/PURGE or PURGE/SORT: Start at one end of the desk and remove each item: ask yourself what category should it go into: Keep, Toss, Donate, Distribute.  Place in appropriate box (or wastebasket/plastic bag if to be Tossed)
    NOTE: Minimize the number of things you keep on your desk; this is the optimal time to get rid of anything that will not support your goal towards efficient workflow.  Remember: simplicity will make your workspace feel less cluttered, thus making it easier to work freely and accomplish more.
  4. CATEGORIZE AS YOU GO: Group like items with like to make the categorizing stage go quicker and easier. (i.e., loose papers in one box, necessary items for daily workflow in another, items used on occassion, office supplies, notebooks, etc.)
  5. REMOVE EVERYTHING: Continue removing, purging and sorting until NOTHING is left on your desk.
  6. EMPTY THE BOXES & CLEAN IT OFF: Empty the boxes appropriately then clean the surface of your desk and any equipment left.

Fingers holding stop signTake a step back and look at what you have just accomplished.  YOU HAVE REACHED a clear desk.  Sit in your chair and revel in how it feels.  Stretch your arms out over your desk and touch the emptiness; breathe the space.  It’s pretty awesome, isn’t it?

When you are saturated with the feeling of accomplishment, SEND ME A COMMENT about how it feels – I’d love to hear your feedback.  If you have any questions, as always, feel free to drop me a direct note.

Check back for the next post in this organizing series that will help you understand the mindset shift needed to organize your desk and teach you about the categories needed to continue the process.